Managing Your BarTender Cloud Account |
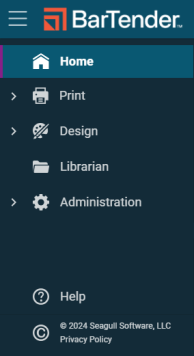
Use the Administration menu to access the account management features that are available for your role, as follows:
-
Administrators can perform the following functions:
-
Configure global account information
-
View usage statistics and event log data
-
Manage user accounts, groups, and roles
-
Set up and manage spaces
-
Upload and manage fonts
-
Register a web application that can be used to access the BarTender Cloud REST API to automate printing processes
-
-
Both administrators and non-administrators (depending on their role and on the permissions that they are granted) can perform the following functions:
-
View subscription information
-
Manage printers
-
View and export print history data
-
Reprint whole print jobs or individual items
-
Use the My Profile page to update their profile information and upload a profile image for themselves Accessed from the Profile menu in the header bar of any BarTender Cloud page.
-
Use the BarTender Cloud API page to manage a private access token Accessed from the API Keys menu item
-
-
To access the Administration menu, click
 ,then click Administration.
|
|
Access to the BarTender Cloud REST API is included with the Automation subscription plan. |

Configuring Global Information
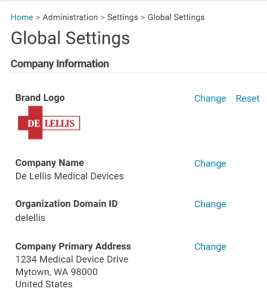
Open the Administration menu and click Settings, Global Settings to display the
-
In the Company Information area, you can enter and edit your company's name and address and your organization domain ID and upload a logo.
-
In the Points of Contact area, you can add, change, or remove the email addresses of the users in your company who are points of contact for BarTender Cloud account notifications, billing notifications, and technical administration.
-
In the Security area, you can configure two-factor authentication, and specify a third-party authentication service.
Customizing Your Organization's Information
You can replace the default BarTender Cloud logo with your company logo as well as customizing your company's name, ID, and address on the Global Settings page.

To set or modify branding information, click Change beside the information you want to work with. If you click Reset for the Brand Logo field, BarTender Cloud returns to its default logo.
|
|
You cannot undo resetting the logo. If you reset the logo and want to revert back to your logo, you will need to re-upload your company's logo. |
Configure Print Settings
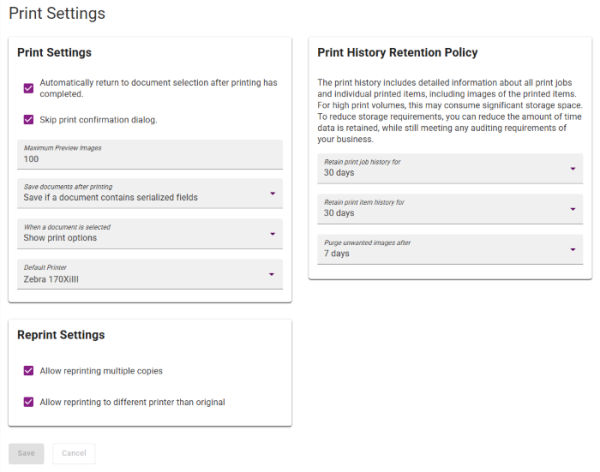
Open the Administration menu and click Settings, Print Settings to display the

Viewing Print History Data and Reprinting Items
Open the Print menu and click Print History/Reprint to display the Print History page, which you can use to view, sort, and filter your print history data; to export data to an external file; and to reprint whole print jobs or individual printed items.
Creating and Modifying a User Account
Open the Administration menu and click Security, then select Users to display the
Creating and Modifying User Groups
Open the Administration menu and click Security, then select Groups to display the Groups page, which you can use to create, edit, and delete user groups.
Creating and Modifying User Roles
Open the Administration menu and click Security, then select Roles to display the Roles page, where you can view, create, search, edit, and manage all your user roles. You can create any number of roles to assign to your user accounts. These roles define the permissions that each user has to access BarTender Cloud features.
![]() To modify an existing user role
To modify an existing user role
Managing Printers
Open the Administration menu and click Printers to display the Printers page, which you can use to view your printers as organized by their location or by the groups they are assigned to. You can also create and modify printer groups. Click a location or group name, and then click a printer to open its Printer Details page, where you can view and manage the printer's print queue, permissions, settings, and so on.
Managing Spaces
If your subscription includes Spaces, open the Administration menu and click Spaces to display the
|
|
Access to the BarTender Cloud REST API is included with the Automation subscription plan. |
Managing Fonts
Open the Administration menu and click Fonts to open the BarTender Cloud Fonts page, where you can upload and manage custom TrueType and OpenType fonts.
Accessing the BarTender Cloud REST API
Open the Administration menu and click API Keys to display the
|
|
Access to the BarTender Cloud REST API is included with the Automation subscription plan. |
Viewing Usage Data
Open the Administration menu and click Usage to display the
Configuring Your User Profile Settings
Expand the Profile menu ( ) and select My Profile to display the My Profile page, where you can view and edit your user profile, including general information and contact information. You can also use this page to send a password reset email message and to opt in or out of receiving email newsletters from Seagull Scientific about BarTender Cloud.
The following options are available:
-
User Information: In this area, you can upload an image to use as a profile image and enter basic information such as name, address, job title, and company name.
-
Contact Information: In this area, you can enter or edit your email address and phone number.
-
Security: In this area, you can view information about the last time your account password was reset, and you can click Reset Password to send a password reset email message.
-
Terms/Email Preference: In this area, you can click to view the BarTender Cloud Terms of Service and subscribe or unsubscribe from receiving email newsletters about BarTender Cloud.
Related topics


 icon, then click the option that you want.