Authentication |
Authentication Applications
The following sections provide information about authentication for each client application type
 Web Applications
To better understand how to create a BarTender Cloud-enabled application, refer to C# Web-Based Application Example.
Download the CodeFlow sample web application at the following website:
The CodeFlow sample web application is a revised version of the web-based "LibrarianWebApp" application that was previously provided and documented in the BarTender Cloud help system. This legacy application is located at the following website:
The changes that are made in the CodeFlow sample web application include the following:
-
The scope "user:query" is not supported by the enhanced identity provider and must be removed, as follows (if you include it in the sign-in workflow, an error message will be displayed):
// Configure the scope.
options.Scope.Clear();
options.Scope.Add("openid");
options.Scope.Add("BarTenderServiceApi");
options.Scope.Add("user:query"); -
Optionally, you can send a fixed organization domain ID during the sign-in workflow to bypass the organization prompt that the enhanced identity provider usually displays, as follows:
context.ProtocolMessage.SetParameter("OrganizationDnsName", "myorg1234");
-
The OnRedirectToIdentityProviderForSignOut handler has been changed slightly with a renaming of the query parameter that is used to convey the sign-in redirect location.
Console Applications and Services (Password-based)
To better understand how to create a BarTender Cloud-enabled console application or service, refer to C# Password-Based Application Example.
Download the ResourceOwnerPasswordFlow sample console application at the following website:
The ResourceOwnerPasswordFlow sample application is a revised version of the password-based "PasswordBasedAuthLogon" console application that was previously provided and documented in the BarTender Cloud help system. This legacy application is located at the following website:
The changes that are made in the ResourceOwnerPasswordFlow sample console application include the following:
-
The scope "user:query" is not supported by the enhanced identity provider and must be removed, as follows (if you include it in the sign-in workflow, an error message will be displayed):
// Configure the scope.
options.Scope.Clear();
options.Scope.Add("openid");
options.Scope.Add("BarTenderServiceApi");
options.Scope.Add("user:query"); -
Token requests must include the target organization domain ID. This is required because BarTender Cloud now allows an email address to be used with more than one organization.
For example, retrieve the OpenID discovery document for the target cluster. For the "MyTenant" cluster, this would be an http REST GET request against the following endpoint:
America
https://auth.am1.bartendercloud.com/.well-known/openid-configuration
APAC
https://auth.ap1.bartendercloud.com/.well-known/openid-configuration
Europe
https://auth.eu1.bartendercloud.com/.well-known/openid-configuration
The returned document will include the following key-value pair:
America
"token_endpoint":
"https://auth.am1.bartendercloud.com/connect/token",APAC
"token_endpoint":
"https://auth.ap1.bartendercloud.com/connect/token",Europe
"token_endpoint":
"https://auth.eu1.bartendercloud.com/connect/token",A correctly configured REST POST request against this endpoint, with the required OrganizationDnsName query parameter present, will then return an access token for the specified user, such as the following:
America
https://auth.am1.bartendercloud.com/connect/token?OrganizationDnsName=mytenant
APAC
https://auth.ap1.bartendercloud.com/connect/token?OrganizationDnsName=mytenant
Europe
https://auth.eu1.bartendercloud.com/connect/token?OrganizationDnsName=mytenant
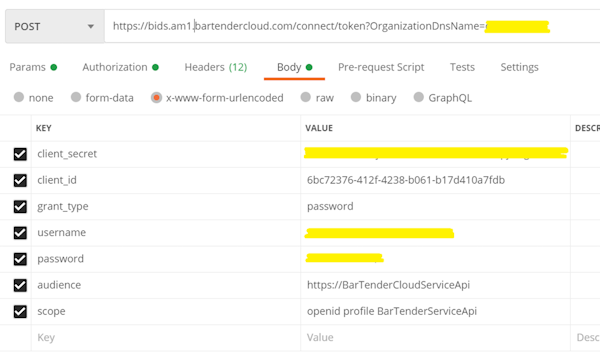
![]() Request an access token using Postman
Request an access token using Postman
In Postman, all the fields that are shown in the following image are required. If your application supports refresh tokens, then "offline_access" would be included with the list of scopes.
Completing the Authentication Process
Before users can access the BarTender Cloud REST API and send requests, they must complete the authentication process, which ensures that your account is accessed only by authorized users. Authentication provides the bearer access token that all API requests must include.
The authentication method that is used is determined in part by the type of application that your users use to access BarTender Cloud, as follows:
-
Web-based applications use OAuth Code Flow (
 opens in a new browser tab). When you use this method, access tokens are handled automatically.
 -
Console-based applications use OAuth Password Resource Owner Flow (
opens in a new browser tab). When you use this method, you must manually allow access to the users whom you want to authorize.
To use an application to access the BarTender Cloud REST API, you must first register it with BarTender Cloud. Then, BarTender Cloud can recognize and support your application, and authorized users can use it connect to the BarTender Cloud API endpoints to create automation scripts. The number of applications that you can register depends on your subscription plan.
You can edit or delete your registered applications, and you can also rotate (change) an application's ID and secret as needed.
To open the BarTender Cloud API page
-
Click
 to open the BarTender Cloud menu, then click Administration, and select API Keys to display the BarTender Cloud API page.
Configuring a Web-based App for OAuth Access
![]() To register a web application with BarTender Cloud
To register a web application with BarTender Cloud
-
Click Register Application for OAuth Access.
-
In the Register Web Application dialog, complete the following fields as appropriate:
-
Name: Specifies the name that you want for the web application. This is the "friendly" display name.
-
Description: Specifies an optional description for the web application.
-
Login URI: Specifies the URI for your web application's sign-in page, which is the page that BarTender Cloud will use to sign in to your application (for example: https://mycustom-domain.com/login).
-
Callback List: Specifies one or more URLs for BarTender Cloud to call back to after a user is authenticated. After a user successfully signs in, these URLs redirect to one or more default web pages within your application.
-
Logout URLs: Specifies one or more URLs for BarTender Cloud to redirect to after the user signs out of the web application.
-
Allowed Origins (CORS): Specifies one or more URLs that can make JavaScript requests to the API. These URLs are typically used with cross-origin resource sharing (CORS).
-
Allowed Web Origins: Specifies the URLs where an authorization request that uses cross-origin authentication can come from. These URLs are typically used with CORS.
-
Click Register. The dialog closes, and your newly registered web application is listed on the BarTender Cloud API page.
![]() To view and copy the application ID or secret
To view and copy the application ID or secret
-
In the application list, click
 for the application that you want, and then click View ID & Secret.
 -
In the Web Registration ID and Secret dialog, click
 for the application ID or secret to copy it to the clipboard, and then paste it into a secure location.
 -
Click Close.
![]() To rotate the application ID and secret
To rotate the application ID and secret
-
In the application list, click
for the application that you want, and then click View ID & Secret. -
In the Web Registration ID and Secret dialog, click Rotate ID & Secret.
![]() To edit an existing web application
To edit an existing web application
-
In the application list, click
for the application that you want, and then click Edit. -
In the Edit Web Application Registration dialog, make the edits that you want, and then click Save.
![]() To delete an existing web application
To delete an existing web application
-
In the application list, click
for the application that you want, and then click Delete. -
In the Delete Web Application Registration dialog, click Delete Registration.
Configuring a Console App for Password-based OAuth Access
![]() To register a console application or service with BarTender Cloud
To register a console application or service with BarTender Cloud
-
Click Register Application for Password-Based Access.
-
In the Register Password-Based Access dialog, complete the following fields:
-
Name: Specifies a name for the application or service. This is the "friendly" display name.
-
Description: Specifies an optional description for the application or service.
-
Click Register. The dialog closes, and your newly registered application or service is listed on the BarTender Cloud API page.
To allow users to access the BarTender Cloud API by using your console application or service, you must select Allow password-based API access for them in the user information dialog that appears when you click Edit for a user on the Users page. For more information, refer to Managing Users.
![]() To view and copy the application ID or secret
To view and copy the application ID or secret
-
In the application list, click
for the application or service that you want, and then click View ID & Secret. -
In the Web Registration ID and Secret dialog, click
for the application ID or secret to copy it to the clipboard, and then paste it into a secure location. -
Click Close.
![]() To rotate the application ID and secret
To rotate the application ID and secret
-
In the application list, click
for the application or service that you want, and then click View ID & Secret. -
In the Web Registration ID and Secret dialog, click Rotate ID & Secret.
![]() To edit an existing application or service
To edit an existing application or service
-
In the application list, click
for the application or service that you want, and then click Edit. -
In the Edit Password-Based Access dialog, make the edits that you want, and then click Save.
![]() To delete an existing application or service
To delete an existing application or service
-
In the application list, click
for the application or service that you want, and then click Delete. -
In the Delete Web Application Registration dialog, click Delete Registration.
Test Access Token
An access token is a long unique alphanumeric string that provides identifying information about the user who is making the API call and the BarTender Cloud tenant space and data center that the call is going to. You add your access token to the script that you write to send API calls to the server, such as cURL commands, PowerShell scripts, and JavaScript scripts.
BarTender Cloud provides a temporary test access token that you can use for testing your application's connection to BarTender Cloud. These test access tokens expire after ten days and must be refreshed manually.
![]() To view and copy your test access token
To view and copy your test access token
-
Click View Access Token.
-
In the Personal Access Token dialog, click Copy Access Token to copy the access token to the clipboard, and then paste it into a secure location.
![]() To refresh your test access token
To refresh your test access token
-
Click View Access Token.
-
In the Personal Access Token dialog, click Refresh Access Token to generate a new access token and automatically copy it to the clipboard.
-
Paste the access token into a secure location.