Importing a Workflow from BarTender

You can import a workflow that has been exported from the on-premises version of BarTender into BarTender Cloud.

If you are having trouble seeing the transition objects in the Workflow Designer, you can increase the Zoom setting on your screen.

  • To access the Workflow page, click to open the BarTender Cloud menu, then open Design and click Workflows.

ClosedTo import a workflow

  1. On the Workflows page, select Import Local Workflow.

  2. In the Open dialog, navigate to the Workflows folder.

    The path to the Workflows folder is usually: Program Files > Seagull > BarTender[version] > Workflows.

  3. Select the file for the workflow you want to import, then Click Open. The imported workflow displays in the Workflow Details page.

  4. Click or Save.

  5. Modify the imported workflow as necessary.

While you can import any workflow that has been exported from BarTender on-prem into BarTender Cloud, the workflows are not 100% compatible so you may need to adjust some settings in the imported workflow to make it compatible with BarTender Cloud.

As you work through the process of modifying an imported workflow, BarTender lets you know if settings are missing or incorrect. The Error List at the bottom of the Workflow Designer page displays any issues that arise during the modification of a workflow.

  • To open the Workflow Designer, click the workflow you want to work with on the Workflow page.

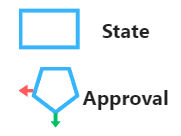
ClosedTo add a State or Approval object to your workflow

  1. Click the object in the Objects toolbox.

  2. Drag the object to the location in the workflow where you want to place it.

ClosedTo add a Text object to your workflow

  1. In the Objects toolbox, click the Text object.

  2. Drag the Text object to the location in the workflow where you want to place it.

  3. Double-click the Text object and enter the text you want to display in the workflow.

  4. Click outside the Text object to save your entry.

ClosedTo define the settings for a State object:

  1. Select a State object in the workflow canvas.

  2. On the General tab of the State section of the page, enter a name for the object.

  3. Click the Permissions tab.

  4. Click to add a new user or group.

  5. In the Groups list, select the groups to add to this object.

  6. In the Users list, select the users to add to this object.

  7. Click Add.

    • Open the users or groups you have just added and set the permissions (Allow or Deny) for the user or group.

  8. Click the Actions tab.

  9. Select Send enter state notification to enable this object to send notification emails, then click Setup.

  10. In the Enter state notification dialog, define who will receive the notification, the subject line of the notification, and the contents of the notification.

  11. Click Save, then click Cancel.

ClosedTo define the settings for an Approval State object

The Approval State object is a specialized object that makes it possible for users who have the correct permissions to either approve the document and advance it from this state to the next state or reject the document and send it back to a previous state.

  1. Select an Approval State object in the workflow area.

  2. On the General tab of the Approval State section of the page, enter a name for the object.

  3. In the Before leaving state section of the tab, specify how approvals and rejections are handled for this object.

    • All members must approve: All members assigned to the object must either approve or reject the file for it to leave this state.

    • Any member either approves or rejects: Any member can approve or reject the file.

    • Specific number of members approves: A specified number of members must either approve or reject the file for it to leave this state.

      • Number of members: Enter the number of members required to approve or reject the file.

  4. In the Assigned members section, click to add users or groups to the Approval State object. These are the members referenced in the Before leaving state section.

    • To remove an assigned user or group, click beside the member you want to remove.

  5. Select the Set as production (published) checkbox to permit users with permissions to access published files to access this file when it is in this state.

  6. Click the Permissions tab, then click to add a new user or group.

  7. In the Groups list, select the groups to add to this object.

  8. In the Users list, select the users to add to this object.

  9. Click Add.

    • Open the users or groups you have just added and set the permissions (Allow or Deny) for the user or group.

  10. Click the Actions tab.

  11. Select Send enter state notification to enable this object to send notification emails, then click Setup.

  12. In the Enter state notification dialog, define who will receive the notification, the subject line of the notification, and the contents of the notification.

  13. Click Save, then click Cancel.

Closed To add a Transition object to your workflow

  1. Add the object you wish to connect with a transition to the workflow.

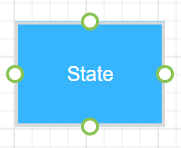
  2. Hover over the object from which you want start the transition until the sizing handles appear.

  3. Click on the handle nearest the object you want to transition to and drag to that object. The transition object appears with the directional arrow pointing to the target state object.

  4. When you reach the target object, drop the handle.

ClosedTo define settings for a Transition object.

  1. Select a transaction object in the workflow area.

  2. On the General tab of the Transition section of the page, you can do the following:

    • Name: Enter a name for the transition.

    • Prompt for comment: Select to prompt the user for a comment when entering this state.

    • Comment is required: Select to make commenting required.

    • Initial comment: Enter an initial comment that displays when entering to this state.

  3. Click the Permissions tab.

  4. Click to add a new user or group.

  5. In Groups, select the groups that can run this transition.

  6. In Users, select the users that can run this transition.

  7. Click Add.

    • Open the users or groups you have just added and set the permissions (Allow or Deny) for the user or group.

  8. Click the Actions tab.

    You can create a notification email message that is sent to specified users and groups whenever a file goes through a transition or enters a transition.

  9. Select Send notification to send notification emails when the transition completes, then click Setup.

  10. In the Enter state notification dialog, define who will receive the notification, the subject line of the notification, and the contents of the notification.

  11. Click Save, then click Cancel.

When you have finished building your workflow, click or Validate to verify that your workflow does not have any errors in it. If errors are present, a dialog displays indicating what needs to be fixed. If no errors are preasent, a dialog displays indicating that the work flow is ready to be published.

Editing a Workflow

To edit an existing workflow, access the Workflow Designer.

  1. On the Workflow Designer page, for the workflow you want to modify, click , or click and choose Edit.

  2. The Workflow Designer opens with that workflow displayed on the workflow canvas.

  3. Modify the State, Transition and Text objects as necessary.

Renaming a Workflow

  1. On the Workflow Designer page, for the workflow you want to rename, click and choose Rename.

  2. In the Name field of the Save Workflow dialog, enter a new name for the workflow.

  3. In the Comment field, accept the previous comment, modify the previous comment, or add a new comment.

  4. Click Save.

Deleting a Workflow

You can delete a workflow from the designer. Deleting the workflow will remove it from any space to which it has been assigned.

  1. On the Workflow Designer page, for the workflow you want to delete, click and choose Delete.

  2. In the Confirm Delete dialog, type the entire phrase as it is displayed to confirm that you want to delete the workflow.

  3. Click Delete.

Once a workflow has been deleted, the deletion cannot be undone.


Related topics