 on the main toolbar.
Page Setup Dialog |
When you design an item to print, you must configure the template to match the size of the media that you are using and configure the appearance of the template. Use the Page Setup dialog to specify the media stock, set up margins, and create multiple templates. Additionally, you can use this dialog to preview the appearance of the template.
on the main toolbar.
You can also use this dialog to access the Page Setup wizard, which guides you through the process of selecting a printer, configuring the printer stock, and creating a new template. To start the Page Setup wizard, click Wizard in the bottom left corner of the Page Setup dialog.
The following tabs are available.
Use the Stock tab to format your page to fit common media types.
The following mini-tabs are available.
The Predefined Stocks mini-tab defines the media for your printer. The following options are available:
Category: Specifies the manufacturer of the printer media. If the manufacturer that you want is not listed, click Save to create a custom stock by using the Save Stock dialog.
Stock Name: Lists the available stocks in the selected category. If the stock that you want is not listed, click Save to create a custom stock by using the Save Stock dialog.
Save: Opens the Save Stock dialog, where you can add manufacturers and stock types.
Delete: Removes the currently selected stock type. If the stock type that you remove is the only one that is listed for a given manufacturer, the manufacturer is also removed.
|
Required Drivers |
Use the RFID Antenna mini-tab to display an image on your template that represents an item's RFID antenna. The following options are available.
Show RFID Antenna Image: Displays the antenna image on the template.
|
|
To display the antenna image, you must also select the Show RFID Antenna on Template option, which is located on the General tab of the User Preferences dialog. |
Image
Image: Specifies the file that contains the image of the antenna. You can specify the folder that is used by this list on the File Locations page in Administration Console.
Add: Opens the Select Picture dialog so that you can browse to an antenna image file and then add it to the Image list.
Delete: Deletes the currently selected antenna image file from the Image list.
Size
Method: Provides the following options for sizing the antenna image:
Original Size: Specifies that BarTender uses the original size of the image.
Fit to Template: Specifies that the image shrinks or expands as needed so that it fits entirely within the template boundaries.
Fit to Height: Specifies that the image shrinks or expands as needed so that its height fits the height of the template. The height-to-width ratio of the original size is maintained.
Fit to Width: Specifies that the image shrinks or expands as needed so that its width fits the width of the template. The height-to-width ratio of the original size is maintained.
Custom: Specifies that the image's dimensions are set in the Height and Width boxes.
Height: Specifies the height of the antenna image.
Width: Specifies the width of the antenna image.
Position
For more information about the position options, refer to Understanding Origin Points and Anchors. The following position options are available:
X: Specifies the distance, left or right, of the antenna image's anchor from the origin point.
Y: Specifies the distance, higher or lower, of the antenna image's anchor from the origin point.
Anchor: Specifies the antenna image's anchor.
Advanced: Opens the Advanced Position Settings dialog, where you can configure the origin point.
Rotation
Angle: Specifies the degrees by which the antenna image is rotated around the rotation point.
|
Required Drivers |
Drivers by Seagull™ |
Use the Magnetic Stripe mini-tab to display an image that represents an item's magnetic stripe on your template. The following options are available.
Image
Display: Specifies the location of the magnetic stripe on your items.
Color: Displays the currently selected color of the magnetic stripe image as it appears on the template. To select a different color, click this option, and then use the Color Picker to select the color that you want. For more information, refer to Changing an Object's Color.
Show in Print Preview: Displays the magnetic stripe image in Print Preview mode.
Position
Offset From: Specifies the location of the magnetic stripe on the cards.
Offset: Specifies the distance of the magnetic stripe from the location that is specified in Offset From.
Thickness: Specifies the height of the magnetic stripe as it appears on the template.
Use the Page tab to set options for the page, including page size and orientation, the printer paper tray to use during printing (if tray options are available), and whether to use printing effects. On this tab, you can also specify whether there is a different design that needs to be printed on the back of the page, how the back page should be printed relative to the front, and whether you will use a page template to enhance your page.
The following options are available.
Page Size
Page Size: Specifies the size of the page that is being used with your printer. The options that are listed are those that are supported by the printer that you have selected. User Defined Size is an option only if your selected printer supports user-defined page sizes.
Width: Specifies a custom width for the page that is being used with your printer. Available when Page Size is set to User Defined Size.
Height: Specifies a custom height for the page that is being used with your printer. Available when Page Size is set to User Defined Size.
|
|
If the backing of the stock is of a greater width or height than the items, enter the width and/or height of the backing here. Use the Margin settings on the Layout tab to adjust for the difference in width and height between the page and the items. |
Paper Tray
Source: Specifies the source if multiple trays are available on the current printer. Available only for page printers.
Orientation
Orientation: Specifies an orientation for your items. Portrait and Landscape are always available as options. Some thermal printers also provide Portrait 180 and Landscape 180 options.
Effects
Not all effects are supported by all printers. The Effects area of the Page tab is displayed only if your selected printer supports at least one of the effects, and only the supported effects are available.
Mirror Image: Prints a mirror image of a template, in which the left and right margins are swapped. To swap the top and bottom margins, combine Mirror Image with the Landscape orientation.
Negative: Reverses the pixels that are printed, so that printed text and barcodes are changed to white on a black background.
Template Design Options
Separate designs for front and back of item template: Specifies that you can create two separate designs for your document. When you are printing two-sided items, use this option to print one design on the front side and another design on the back side.
Rotate back side of item template 180: Specifies that your two-sided item is printed so that the top edge of the item's front side aligns with the bottom edge of the item's back side. When this option is not selected, two-sided items are printed so that the top edge of the item's front side aligns with the top edge of the item's back side. Not available on all printers.
Enable page template: Specifies that you can create a page template on which you can place objects anywhere on the page, including in the margins. When you select this option, a Page Template tab is added to the bottom of the design area alongside your existing template tabs and the data entry form. If you also select the Separate designs for front and back of item template option, you can design a separate page template for each side of the item.
For more information, refer to Creating a Page Template.
Use the Layout tab to specify how many items are printed on each page of stock. Additionally, you can specify the margins of each item and define the space between multiple items on the page.
The following options are available.
Layout
Rows: Specifies the number of rows of items on a single page of stock.
Columns: Specifies the number of columns of items across a single page of stock.
Margins
Margins are the spaces between the edge of the page and the edge of the items on the page. If you need to include additional data in the margins of the page (for example, a header or footer that displays the page number, current time, user, or document name), you can place this information on the page by creating a page template. To do this, click to select the Enable Page Template check box on the Page tab of the Page Setup dialog. For more information, refer to Creating a Page Template.
The following margin options are available:
Top: Specifies the distance between the top edge of the page and the top of the first row of items.
Bottom: Specifies the distance between the bottom edge of the page and the bottom of the last row of items.
Left: Specifies the distance between the left edge of the page and the left edge of the first column of items.
Right: Specifies the distance between the right edge of the page and the right edge of the last column of items.
|
|
Most laser and other page printers cannot print within a certain narrow zone around the perimeter of a page. This "unprintable region" varies from printer to printer. For example, Hewlett-Packard compatible laser printers cannot print closer than about 0.200 inch to the edges of the page. Therefore, you cannot print right up to the edge of your page by changing your margins to zero. For more information, refer to Show Unprintable Region. |
Template Size
Width: Specifies the width of your items. Available when Set Manually is selected.
Height: Specifies the height of your items. Available when Set Manually is selected.
Set Manually: Specifies that you can manually set the height and width of your items. When this option is not selected, BarTender automatically calculates the size of your items based on your stock selection and the other settings in the Page Setup dialog.
Gap / Pitch
Horizontal: Specifies the width of the gap between columns of items on a single page of stock. Available when Set Manually is selected.
Vertical: Specifies the height of the gap between rows of items. Available when Set Manually is selected.
Set Manually: Specifies that you can manually configure the size of the gaps between items on your page of stock. When this option is not selected, BarTender automatically calculates the gap size based on your stock selection and the other settings in the Page Setup dialog.
Use the Shape tab to specify the shape of the items that you print. The following options are available.
Template Shape
Template Shape: Specifies the general shape of your items.
|
|
To design a circular item, select Ellipse as the printed item shape. On the Layout tab, click to select Set Manually under the Item Size heading, and then enter the diameter of the item in both the Height and Width fields. |
Options
Print Borders: Specifies that the border around each item is printed when a print job is run.
Line Width: Specifies the width of the border around the item. Available when Print Borders is selected.
Line Color: Displays the currently selected color of the border around the item. To select a different color, click this option, and then use the Color Picker to select the color that you want. For more information, refer to Color Picker. Available when Print Borders is selected.
Corner Radius: Specifies the size of the arc that is found on the corners of the item. Available when Rounded Rectangle is selected as the item shape.
Hole: Specifies that the item has a hole in its center. Available when Ellipse is selected as the item shape.
Hole Diameter: Specifies the size of the hole in the center of the item. Available when Ellipse is selected as the item shape.
The Media Handling tab specifies the action that is taken at the end of each page or print job. These settings enable driver-supported devices such as cutters and label taken sensors to be used in a print job. For more information, refer to Media Handling.
The following options are available.
Media Handling
Action: Specifies the media handling action. The default setting is Use Driver's Settings. The actions that are available vary depending on the printer that is used and include the following:
Use Driver's Settings: No action is taken unless the printer driver itself is configured to take an action.
Page Break: No additional labels are printed on the current page, and any subsequent labels are printed on a new page. If the format has only one label per page, no action is taken.
Pause: The printer waits for user input before it prints any subsequent labels.
Wait for Label Taken Sensor: The printer waits until the label taken sensor is activated before it prints any subsequent labels.
Cut: The label stock is cut.
Cut and Pause: The label stock is cut, and the printer waits for user input before it prints any subsequent labels.
Partial Cut: The label stock is partially cut.
Partial Cut and Pause: The label stock is partially cut, and the printer waits for user input before it prints any subsequent labels.
Driver Settings: Opens the printer driver's Printer Properties dialog, which you can use to select and configure media handling options.
Occurrence: Specifies when the selected media handling action takes place.
At End of Print Job: The selected action is performed at the end of the print job.
After Every Page: The selected action is performed at the end of each page. If the document contains only one item per page, this action takes place after every item.
After Every Record: The selected action is performed after all items that are associated with a given database record are printed.
After Copies: The selected action is performed after all copies of an item are printed.
After Data Change: The selected action is performed after the specified data source value changes.
After Specified Number of Printed Items: The selected action is performed after the specified number of items are printed. The Number of Printed Items text box is available to set the value at which the selected action occurs.
Data Item: Specifies the data source whose value is changed. Click the  icon to open the Select Data Source dialog, where you can select the data source that you want. Available if After Data Change is selected as the occurrence.
Ignore Case: Specifies that the comparison between values of the specified data item ignores differences in case. Available if After Data Change is selected as the occurrence.
|
|
Some thermal printers do not support all media handling actions. The Action list shows only the actions that are supported by the selected printer. Page printers have only the Use Driver's Settings and Page Break options. |
The Printing Order tab specifies the order in which multiple items are printed on a single page of stock. Additionally, you can specify where to start printing if a previous print job resulted in unused stock. These options apply only when you print items that have multiple items per page, such as laser or ink-jet printer labels.
The following options are available.
Printing Order
Depending on the starting corner and direction that you specify, the preview image is updated to show the order in which the items are printed. The following options are available:
Starting corner: Specifies which corner of the page is printed as the first item.
Direction: Specifies the direction in which items are printed, as follows:
Horizontal: Items are printed row by row, from either the left or the right side of the stock, depending on the starting corner.
Vertical: Items are printed column by column, from either the top or the bottom side of the stock, depending on the starting corner.
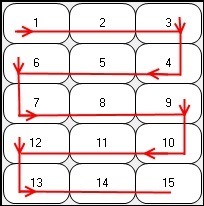
Horizontal (Alternating): Items are printed row by row, with the first row being printed from either the left side or the right side of the stock, depending on the starting corner, and with each subsequent row being printed from the same side on which the printing ended for the previous row. The following image shows the order in which items are printed when you select Horizontal (Alternating) with a Starting corner of Top Left.
Vertical (Alternating): Items are printed column by column, with the first column being printed from either the top or the bottom side of the stock, depending on the starting corner, and with each subsequent column being printed from the same side (top or bottom) on which the printing ended for the previous column. The following image shows the order in which items are printed when you select Vertical (Alternating) with a Starting corner of Top Left.

Select starting position at print-time: Specifies that the Starting Position dialog is displayed at the start of each print job. By using the Starting Position dialog, you can select which item is printed as the first item of the print job. When neither of the following two options are selected, the Starting Position dialog's preview of the stock page displays the print items in the order that they are printed based on the Starting corner and Direction options that you previously selected. By default, the first printed item is the item that is identified by the Starting corner option.
The following options are available:
Continue from last position of previous job: Specifies that BarTender keeps track of which item on a partially used page of stock should be used for the first printed item in the next print job. At the beginning of the print job, the Starting Position dialog opens and uses gray shading on the preview to show the items on the page that have already been printed. Based on the Starting corner and Direction options that you previously specified, BarTender determines the first item with which to begin the next print job, and that item is specified in the Starting Position dialog's Starting Position field.
Specify by row and column number: Specifies that the preview of the stock page, on both the Page Setup dialog's Printing Order tab and the Starting Position dialog, is modified to display the print items by a combination of row number and column number.
|
|
For more information about how to specify the starting position at print time, refer to Starting Position Dialog. |
The Templates tab displays a list of all available templates in the open BarTender document. By using the Item Templates list, you can easily see how your templates are organized, reorder the templates, specify the frequency with which each template is printed, and specify conditional printing criteria for each template. For more information, refer to Using Template Selectors.
The following options are available.
Item Templates
Start of Job Template(s): When you place a template in this folder, BarTender prints the item one time, at the beginning of the print job.
Start of Group Template(s): When you place a template in this folder, BarTender prints the item each time the specified data source changes (as specified in the Group Field option). For templates in this folder, copy count and serialization count are ignored.
Primary Template(s): The templates that you place in this folder can be printed multiple times, based on the copy count and/or serialization settings.
End of Group Template(s): When you place a template in this folder, BarTender prints the item each time the specified data source changes (as specified in the Group Field option). For templates in this folder, copy count and serialization count are ignored.
End of Job Template(s): When you place a template in this folder, BarTender prints the item one time, at the end of the print job.
Template Toolbar
The template toolbar is located below the Item Templates list. Use it to add new templates, remove existing templates, and reorder the templates in the list. The following options are available:
 Adds a new template to the list.
 Adds a new template selector to the list.
 Removes the selected template from the list.
 Renames the selected template.
 Deletes the selected template from the list and places a copy of the template on the Clipboard.
 Copies the selected template to the Clipboard.
 Pastes a copy of the template from the Clipboard into the template list.
 Moves the selected template up one position in the list.
 Moves the selected template down one position in the list.
Template Properties
Group Field: Specifies the data source whose value is checked for changes, which prompts the printing of the template. Available only when you select a template in the Start of Group Template(s) or End of Group Template(s) folder.
Opens the Select Data Source dialog, where you can select the data source that you want.
Print When: Specifies when BarTender prints the selected template.
Opens the When to Print dialog, which you can use to configure specific conditions that determine when the template is printed.
Do not print template if empty: Specifies that the template is not printed if there are no printable objects on it.
Use the Background tab to configure the background on your printed items. This can be a printed background, such as a picture or color. Alternatively, you can select a template image, which can serve as a design guide that you do not intend to print on your items.
The following mini-tabs are available.
The Picture mini-tab specifies the picture that is used as the background for your items.
Source: Specifies the source of the picture. The following options are available:
No Picture: Specifies that no picture is used for the background.
Embedded Picture: Specifies that the picture is added to and saved as part of the BarTender document.
Get Picture From: Provides the following options for importing the picture:
File: Opens the Select Picture dialog, which you can use to locate and then import a picture file into your template from your computer.
Scanner or Camera: Opens the Scanner and Camera Setup dialog, which you can use to import pictures from a scanner or camera device.
Linked Picture: Specifies that the picture remains a separate file and only the path to it is added to the document.
File Name: Specifies the path and file name of the background picture. Click Browse to browse to the file.
Size method: Specifies how BarTender resizes the background picture. The following options are available:
Original Size: Specifies that BarTender uses the original size of the picture.
Fit to Height: Specifies that the picture shrinks or expands as needed so that its height fits the height of the template. BarTender maintains the picture's height-to-width ratio.
Fit to Width: Specifies that the picture shrinks or expands as needed so that its width fits the width of the template. BarTender maintains the picture's height-to-width ratio.
Stretch: Specifies that the picture shrinks or expands as needed so that it fits the dimensions of the template. If there is an overhang value, the fit may not be exact.
Rotation: Specifies the rotation of the image in degrees.
Options
Preprinted: Specifies that the background picture is treated as if it were already printed on the media. When you select this option, the background picture is not printed, although it appears in the Print Preview window.
Print when: Specifies when BarTender prints the background picture. This option is available only when the Preprinted option is not selected.
Opens the When to Print dialog, which you can use to configure specific conditions that determine when the background picture is printed.
Overhang template: Specifies the distance by which the background picture should exceed the dimensions of the template. This option is useful if the media stock slips a little as it moves through the printer, especially for thermal label printers.
Image Processing: Opens the Background Image Processing dialog, which you can use to modify the appearance of the background picture.
Error Handling: Opens the Error Handling dialog, which you can use to configure the response that occurs if BarTender cannot locate the picture file at print time. Available when you link to an external picture file.
Apply Image Processing Permanently: Saves all picture adjustments, cropping, and effects changes as the new defaults, and then saves the modified image as a new image.
|
|
When you click Apply Image Processing Permanently, any changes that you made are locked in and become the new default settings. Therefore, we recommend that you use the Apply Image Processing Permanently option only after all editing is done. |
Use the Color mini-tab to specify the background color of your items. The following options are available.
Background Color: Displays the currently selected color and/or pattern that appears on the background of your items. To select a different color or pattern, click this option, and then use the Color Picker to select the color or pattern that you want. For more information, refer to Changing the Template Color.
Options
Preprinted: Specifies that the background color is treated as if it were already printed on the media. When you select this option, the background color is not printed, although it appears in the Print Preview window.
Print When: Specifies when BarTender prints the background color. Available only when the Preprinted option is not selected.
Opens the When to Print dialog, which you can use to configure specific conditions that determine when the background color is printed.
Overhang Template: Specifies the distance by which the background color should exceed the boundaries of the template. This option is useful if the printer stock slips a little as it moves through the printer.
Use the Template Image mini-tab to set up an image that you can use to help design your templates. For example, if you already have a design that is printed out or was created in an application other than BarTender, you can scan that design and then place it on your template as a lightened background image that you can use to position your template objects.
The template image cannot be printed. Use it as a model for designing or recreating a template in BarTender.
The following options are available:
Get Template Image From: Provides options for importing the template image, as follows:
File: Opens the Select Picture dialog, which you can use to locate and import the image file into your template from your computer.
Scanner or Camera: Imports the image from a scanner or camera device. To do this, you must first set up the device by using the Scanner and Camera Setup dialog. This enables BarTender to communicate with the device so that the images on the device are available for selection.
Template image color: Displays the currently selected color that is used for the template image. To select a different color, click this option, and then use the Color Picker to select the color that you want. For more information, refer to Color Picker.
Hide template image: Hides or shows the template image. Use this option to see how your items will appear when they are printed.
Remove Template Image: Deletes the template image from your document. Use this option after you complete the template design to reduce the size of your document.
Image Processing: Opens the Background Image Processing dialog, which you can use to modify the appearance of the template image.

