Enable User Interface Requirements |
To enable a user to sign in and sign out of your web application, you must add a user interface that provides that functionality. To do this, you will add an MVC controller to the project, and then update the _Layout.cshtml file.
Add a new MVC controller to your project
-
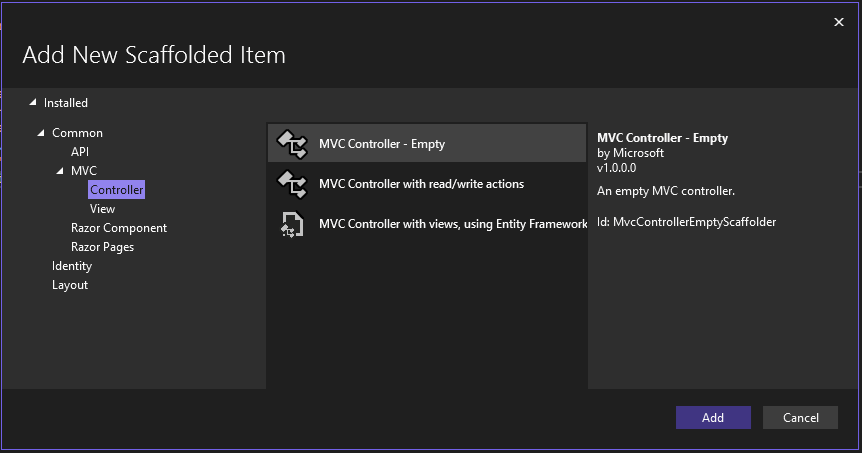
In the project solution in Visual Studio, right-click the Controllers folder, click Add, and then click Controller. The following dialog opens.

-
Click MVC Controller - Empty, and then click Add.
-
Name the new controller "AccountController.cs."
-
Replace the contents of this controller with the following code.
Copyusing Microsoft.AspNetCore.Authentication;
using Microsoft.AspNetCore.Authentication.Cookies;
using Microsoft.AspNetCore.Authorization;
using Microsoft.AspNetCore.Mvc;
using Microsoft.Extensions.Configuration;
using System.Threading.Tasks;
namespace LibrarianWebApp
{
public class AccountController : Controller
{
private const string AccessTokenName = "access_token";
public AccountController(IConfiguration configuration)
{
}
public async Task Login(string returnUrl = "/")
{
await HttpContext.ChallengeAsync("BarTenderCloud", new AuthenticationProperties() { RedirectUri = returnUrl });
}
[Authorize]
public async Task Logout()
{
await HttpContext.SignOutAsync("BarTenderCloud", new AuthenticationProperties
{
// Indicate here where the identity provider should redirect the user after signing out.
// Note that the resulting absolute URI must be added to the allowlist in the
// **Allowed Logout URLs** settings for the client.
RedirectUri = Url.Action("Index", "Home")
});
await HttpContext.SignOutAsync(CookieAuthenticationDefaults.AuthenticationScheme);
}
}
}
The Login() method requests an access token for the current user, while the Logout() method invalidates that access token.
Next, update the application user interface so that the sign-in and sign-out options can be displayed to the user. To do this, update the _Layout.cshtml file.
Update the _Layout.cshtml file
-
In the project, expand the Views folder, and then expand the Shared folder.
-
Right-click the _Layout.cshtml file, and then click Open.
-
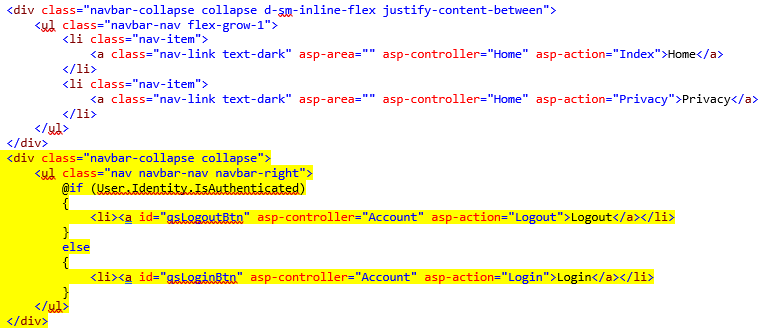
Paste the following lines of code into the file as shown.
Copy<div class="navbar-collapse collapse">
<ul class="nav navbar-nav navbar-right">
@if (User.Identity.IsAuthenticated)
{
<li><a id="qsLogoutBtn" asp-controller="Account" asp-action="Logout">Logout</a></li>
}
else
{
<li><a id="qsLoginBtn" asp-controller="Account" asp-action="Login">Login</a></li>
}
</ul>
</div>
After you complete these steps and then compile and run the application, a "Login" link is displayed at the top of the web page. When you click this link, a sign-in dialog is displayed. By entering your BarTender Cloud user name and password, you can sign in, and the browser can use your access token for making BarTender Cloud API calls.