Open topic with navigation
You can use the Wrap to borders of other objects option on the Text Format property page for a text object to wrap text around or within a shape object.
|

|
Text can also be wrapped around (but not within) other types of objects, such as and pictures.
|
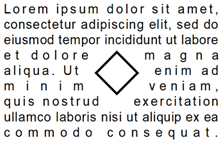
Wrap Text Around a Shape
The following example describes how to wrap text around a shape object, as shown.
 To wrap text around a shape object
-
Add a shape object to the . To do this, click the  icon on the object toolbar to display a list of all available shapes, and then click the shape that you want. Alternatively, click Shape on the Create menu, and then click the shape that you want.
-
Click the template at the location where you want to add the shape, and then drag the shape to the position and size that you want.
-
Add a wrapped text object to the template. To do this, click the  icon on the object toolbar, and then click Normal Wrapped. Alternatively, click Text on the Create menu, and then click Normal Wrapped.
-
Click the template at the location where you want to add the text object.
-
Add the text that you want to the text object.
-
Double-click the text object to open the Text Properties dialog.
-
In the left navigation pane, click Text Format to open the Text Format property page. On this page, configure the following options on the Wrap tab:
-
Click to select Wrap to fit width.
-
In the Alignment list, select Distributed.
-
Click to select Wrap to borders of other objects.
-
In the Wrap method list, select Outside (Tight).
-
Click Close.
-
Drag the text object over the shape object to the position that you want.
|
|
The text that is contained in the text object will wrap around other objects only when those objects are behind the text object in the . If the text does not wrap the way that you expect, the text object might need to be brought to the front of the z-order. To do this, right-click the text object, point to Arrange, point to Order, and then click Bring to Front.
|
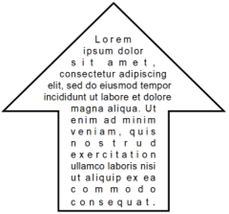
Wrap Text Within a Shape
The following example describes how to wrap text within a shape object, as shown.
To wrap text within a shape object
-
Add a shape object to the template. To do this, click the icon on the object toolbar to display a list of all available shapes, and then click the shape that you want. Alternatively, click Shape on the Create menu, and then click the shape that you want.
-
Click the template at the location where you want to add the shape, and then drag the shape to the position and size that you want.
-
Add a wrapped text object to the template. To do this, click the icon on the object toolbar, and then click Normal Wrapped. Alternatively, click Text on the Create menu, and then click Normal Wrapped.
-
Click the template at the location where you want to add the text object.
-
Add the text that you want to the text object.
-
Double-click the text object to open the Text Properties dialog.
-
In the left navigation pane, click Text Format to open the Text Format property page. On this page, configure the following options on the Wrap tab:
-
Click to select Wrap to fit width.
-
In the Alignment list, select Distributed.
-
Click to select Wrap to borders of other objects.
-
In the Wrap method list, select Inside.
-
Click Close.
-
Drag the text object into the shape object.
|
|
The text that is contained in the text object will wrap within other objects only when those objects are behind the text object in the z-order. If the text does not wrap the way that you expect, the text object might need to be brought to the front of the z-order. To do this, right-click the text object, point to Arrange, point to Order, and then click Bring to Front.
|
Related Topics