Dokumente drucken |
Der Satz erforderlicher Werte zum Drucken eines Dokuments ist in der Print Portal Swagger-Oberfläche unter der Überschrift AutomatedPrint ersichtlich.
Um die API-Druckfunktion zu erläutern, erklären wir anhand der Swagger-Oberfläche, wie JSON-Daten mit Dateinamen, Drucker, Exemplaren und für den Druck erforderlichen Daten veröffentlicht werden.
![]() Ein einfaches Dokument ohne Dateneingabeformular drucken
Ein einfaches Dokument ohne Dateneingabeformular drucken
Für die erste Druckanforderung verwenden wir ein Dokument, dass mit keinerlei Daten verbunden ist. Das Librarian-Dokument heißt „Document1.btw“. Die Librarian-ID erhalten Sie, wenn Sie den Tutorial-Schritt in Bibliotheken aufzählen befolgen. Der Dateiname ist der relative Pfad. Wäre die Datei in einem Unterorder, würde der relative Pfad den Namen dieses Unterordners enthalten, beispielsweise „Production/Document2.btw“. „Production“ wäre dann der Name des Ordners. Sie können die Druckanforderung vereinfachen, das Element Ursprungsordner beseitigen und dann auch einen absoluten Pfad für die Datei definieren (wie im ersten JavaScript-Beispiel unten beschrieben).
{
"AbsolutePath": "c:\\inetpub\\wwwroot\\BarTender\\Templates\\Document1.btw",
"Printer": "PDF",
"Copies": 2,
}
In der Anfragen oben erhalten Sie eine Druckerliste. In diesem Beispiel arbeiten wir der Einfachheit halber mit dem PDF-Drucker.
Die resultierenden JSON-Daten beschreiben die Datei, den übergeordneten Ursprungsordner, den Drucker und die Anzahl der Exemplare.
{
"libraryID": "de6940a6-ff73-465b-aaf2-d39504420fa6",
"relativePath": "Document1.btw",
"printer": "PDF",
"copies": 1
}
Ersetzen Sie „de6940a6-ff73-465b-aaf2-d39504420fa6“ durch Ihre Librarian-ID.
Möchten Sie direkt auf Ihrem Drucker drucken, ersetzen Sie „PDF“ durch einen der gültigen, verknüpften Drucker.
![]() Ein Dokument mit Dateneingabeformular drucken
Ein Dokument mit Dateneingabeformular drucken
Ist ein Dokument mit Daten verknüpft, beispielsweise TLC39 Laser_53_rf, erhalten wie Dokument- und Ordnerdaten über die Library-ID-Anforderung zur Datenausgabe (siehe Bibliotheken aufzählen und Bibliothekselemente aufzählen). Wir erhalten die erforderlichen Daten, indem wir zum installierten Ordner „Print Portal Templates“ und zum Unterorder „Telecommunications“ navigieren. Dort befindet sich der Unterordner „TLC 39“ zum Drucken von TLC39 Laser_53_rf. Wird „Drucken“ ausgewählt, werden die folgende Formularanforderungen und Standarddaten des Formulars angezeigt:
Seriennummer: GRINGS00102028974810
ECI: 663726
CLEI: C5JAB3H1AA
Land: US
Für Dateien mit Daten sind zwei API-Durchläufe erforderlich. Sie müssen die erste Anfrage senden, die mit einer Fehlermeldung beantwortet wird. Diese enthält eine erforderliche „printRequestID“. Die erste TLC39 Laser_53_rf und das dafür erforderliche Datenformular sehen folgendermaßen aus:
{
"libraryID": "de6940a6-ff73-465b-aaf2-d39504420fa6",
"relativePath": "TLC39 Laser_53_rf.btw",
"printer": "PDF",
"copies": 1,
"DataEntryControls": {
"Text Input Box 1": "GRINGS00102028974810",
"Text Input Box 2": „663726“,
"Text Input Box 3": "C5JAB3H1AA",
"Text Input Box 4": "US"
}
}
Ersetzen Sie „de6940a6-ff73-465b-aaf2-d39504420fa6” aus dem Beispiel oben durch Ihre Librarian-ID.
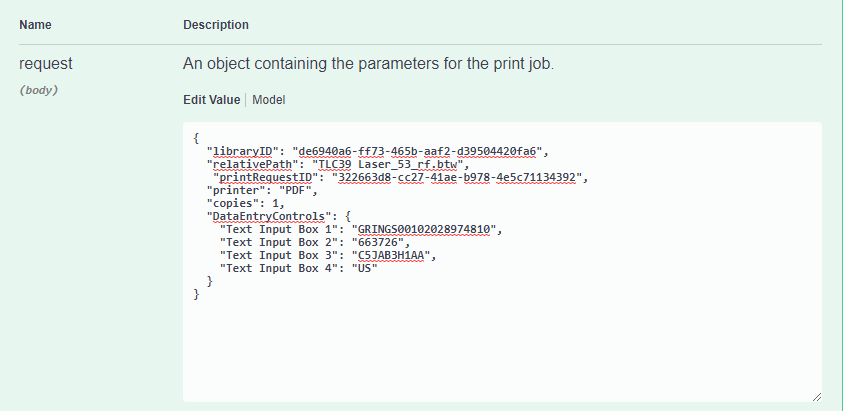
Darauf folgt eine Fehlermeldung mit einer erforderlichen „printRequestID“. Kopieren Sie die „printRequestID“ und fügen Sie diese in die JSON-Daten ein. Das abschließende JSON-Objekt mit der „printRequestID“ sieht folgendermaßen aus:
{
"libraryID": "de6940a6-ff73-465b-aaf2-d39504420fa6",
"relativePath": "TLC39 Laser_53_rf.btw",
"printRequestID": "c1cec9ba-1c42-4a74-93e1-96ecf235c403",
"printer": "PDF",
"copies": 1,
"DataEntryControls": {
"Text Input Box 1": "GRINGS00102028974810",
"Text Input Box 2": „663726“,
"Text Input Box 3": "C5JAB3H1AA",
"Text Input Box 4": "US"
}
}
Ersetzen Sie „de6940a6-ff73-465b-aaf2-d39504420fa6“ durch Ihre Librarian-ID.
Ersetzen Sie „printRequestID“ durch Ihre „printRequestID“.
Wird der Text oben gesendet, erhalten Sie den Pfad zur PDF.

![]() JavaScript-Beispiel: Einfaches Dokument mit wenigen Daten drucken
JavaScript-Beispiel: Einfaches Dokument mit wenigen Daten drucken
/* ----------------------------------------------------------------------
This example demonstrates how to print a file with no data entry form using as little data as
possible such as the absolute path where the file is located,
the printer used (in this case is a PDF printer) and the number of copies
*/

// Change this to the URL, library ID, and document path that you want to print
let basePrintPortalURL = "https://example.com/Bartender/";

fetch(basePrintPortalURL + 'print', {
  method: 'post',
  headers: {
    'Content-Type': 'application/json',
    // If authentication is enabled the header requires "'Authorization': 'Bearer ' + token" to be used
  },
  body: JSON.stringify({
            "AbsolutePath": "c:\\inetpub\\wwwroot\\BarTender\\Templates\\Document1.btw",
            "Printer": "PDF",
            "Copies": 2
             })
})
.then(response => response.json())
.then(result => {
  console.log(result);

   // If successful, the pdf file path is displayed
  console.log(result.filePath);

  // The printRequestID is used to continue the print job in case of a fail request
  console.log(result.printRequestID);

  // If not successful, an error message will be displayed stating the reason why.
  console.log(result.error);

  // Displays the status code of the error message
  console.log(result.statusCode);

})
.catch(error => {

    //The error message 'Failed to fetch' will be displayed in case there is an issue with the request
      console.error('There has been a problem with your fetch operation: ', error.message);
}); ![]() JavaScript-Beispiel: Ein Dokument mit einem Dateneingabeformular drucken
JavaScript-Beispiel: Ein Dokument mit einem Dateneingabeformular drucken
/*-------------------------------------------------------------------------------------------
Printing a file with a single data entry form and PDF printer */

// Change these to the URL, library ID, and document path that you want to print
let basePrintPortalURL = "https://example.com/Bartender/";
//let token = "token_value_from_authentication_call";

// Process our print job
fetch(basePrintPortalURL + 'print', {
  method: 'post',
  headers: {
    'Content-Type': 'application/json',
    // Make sure we add our authentication header to the print request using the token from previous example
    //'Authorization': 'Bearer ' + token
  },
  body: JSON.stringify({
            "AbsolutePath": "c:\\inetpub\\wwwroot\\BarTender\\wwwroot\\Templates\\Telecommunications/TLC 39/TLC39 Laser_53_rf.btw",
            "Printer": "PDF",
            "Copies": 2,
            "SerialNumbers": 4,
            "DataEntryControls": {
                "Text Input Box 4": "US",
                "Text Input Box 3": "C5JAB3H1AA",
                "Text Input Box 2": "663726",
                "Text Input Box 1": "GRINGS00102028974810"  }
               })
.then(response => response.json())
.then(result => {
  console.log(result);

  // The printRequestID is used to continue the print job in case of a fail request
  console.log(result.printRequestID);

  // Specify the data entry fields required to print the label
  console.log(result.requiredDataEntryControls);

  // If successful, a path of the result pdf lcation should display
  console.log(result.filePath);

  // For physical printers, displays a message "BarTender successfully sent the print job to the spooler."
  console.log(result.messages);

  // If not successful, an error message will be displayed stating the reason why.
  console.log(result.error);

  // Displays the status code of the error message
  console.log(result.statusCode);

})
.catch(error => {
  console.error('There has been a problem with your fetch operation: ', error.message);
});![]() JavaScript-Beispiel: Ein Dokument mit mehreren Dateneingabeformularen und Authentifizierung drucken
JavaScript-Beispiel: Ein Dokument mit mehreren Dateneingabeformularen und Authentifizierung drucken
/*----------------------------------------------------------------------
multiple data entry forms and authentication
*/

let basePrintPortalURL = "https://example.com/Bartender/";
let token = "token_value_from_authentication_call";

fetch(basePrintPortalURL + 'print', {
  method: 'post',
  headers: {
    'Content-Type': 'application/json',
    'Authorization': 'Bearer ' + token
  },
  body: JSON.stringify({
        "LibraryID": "9890beae-db51-4b74-a132-d6430a06a192",
        "Relativepath": "Document1.btw",
        "printer": "PDF",
        "copies": 1,
        "DataEntryControls": {
              "Text Input Box 2": "Seattle, WA",
              "Text Input Box 1": "Jon Smith",
              "Date Picker 1": "2020-07-17 00:00:00Z",
              "Text Input Box 3": "Developer",
              "Text Input Box 5": "35 years",
              "Text Input Box 4": "Microsoft"
    }
})

})
.then(response => response.json())
.then(result => {
  console.log(result);
  // The printRequestID is used to continue the print job in case of a fail request
  console.log(result.printRequestID);

  // Specify the data entry fields required to print the label
  console.log(result.requiredDataEntryControls);

  // If successful, a path of the result pdf lcation should display
  console.log(result.filePath);

  // For physical printers, displays a message "BarTender successfully sent the print job to the spooler."
  console.log(result.messages);

  //If not successful, an error message will be displayed stating the reason why.
  console.log(result.error);

  //Displays the status code of the error message
  console.log(result.statusCode);

})
.catch(error => {
  console.error('There has been a problem with your fetch operation: ', error.message);
});![]() JavaScript-Beispiel: Ein Dokument mit einem relativen Pfad und Bibliotheks-ID drucken
JavaScript-Beispiel: Ein Dokument mit einem relativen Pfad und Bibliotheks-ID drucken
/*--------------------------------------------------------------------------------------------
Printing a file specifying the root folder ID and relative path
This document has no data entry form */

let basePrintPortalURL = "https://example.com/Bartender/";
let token = "token_value_from_authentication_call";

fetch(basePrintPortalURL + 'print', {
  method: 'post',
  headers: {
    'Content-Type': 'application/json',
    'Authorization': 'Bearer ' + token
  },
  body: JSON.stringify({
              "LibraryID": "9890beae-db51-4b74-a132-d6430a06a192",
              "Relativepath": "Document1.btw",
              "Printer": "Zebra GX430d - ZPL",
              "Copies": 2,
             })
               })
.then(response => response.json())
.then(result => {
  console.log(result);

  // The printRequestID is used to continue the print job in case of a fail request
  console.log(result.printRequestID);

  // Specify the data entry fields required to print the label
  console.log(result.requiredDataEntryControls);

 // For physical printers, displays a message "BarTender successfully sent the print job to the spooler."
  console.log(result.messages);

 // If not successful, an error message will be displayed, ""
  console.log(result.error);

 // Displays the status code of the error message
  console.log(result.statusCode);
})
.catch(error => {
  console.error('There has been a problem with your fetch operation: ', error.message);
});