Imprimer des documents |
Vous pouvez consulter l’ensemble de valeurs requises pour imprimer un document dans l’interface utilisateur Swagger de Print Portal, dans la section AutomatedPrint.
Pour illustrer la fonction d’impression de l’API, nous allons utiliser l’IU Swagger pour publier nos données JSON qui contiennent le nom du fichier, l’imprimante, le nombre de copies, ainsi que les données complémentaires nécessaires pour imprimer.
![]() Pour imprimer un document simple sans besoin de formulaire de saisie de données
Pour imprimer un document simple sans besoin de formulaire de saisie de données
Pour la première demande d’impression, nous allons utiliser un document auquel aucun formulaire de saisie de données n'est associé. Le nom du document Librarian est Document1.btw. Vous pouvez obtenir l’ID de la bibliothèque en suivant le tutoriel Énumérer les bibliothèques. Le chemin d’accès relatif est le nom du fichier. Si le fichier se trouve dans un sous-dossier, le chemin d’accès relatif comprend le nom du sous-dossier, par exemple, « Production/Document2.btw », où Production est le nom du dossier. Vous pouvez aussi simplifier la demande d’impression, éliminer l’élément du dossier racine, puis définir un chemin d’accès absolu pour le fichier (procédure décrite dans le premier exemple JavaScript et ci-dessous).
{
"AbsolutePath": "c:\\inetpub\\wwwroot\\BarTender\\Templates\\Document1.btw",
"Printer" : "PDF",
"Copies" : 2,
}
D’après la requête précédente permettant d’obtenir la liste des imprimantes disponibles. Dans cet exemple, nous allons utiliser l’imprimante PDF pour des raisons de simplicité.
Les données JSON résultante qui décrivent le fichier, son dossier racine parent, l’imprimante et le nombre de copies.
{
"libraryID" : "de6940a6-ff73-465b-aaf2-d39504420fa6",
"relativePath" : "Document1.btw",
"printer" : "PDF",
"copies" : 1
}
Remplacez « de6940a6-ff73-465b-aaf2-d39504420fa6 » par votre ID Librarian.
Si vous souhaitez imprimer directement avec votre imprimante, remplacer PDF par l’un des imprimantes valides connectées.
![]() Pour imprimer un document lorsqu’un formulaire de saisie de données est requis
Pour imprimer un document lorsqu’un formulaire de saisie de données est requis
Pour un document auquel sont associées des données de formulaire, par exemple, TLC39 Laser_53_rf, nous pouvons obtenir les données du document et du dossier à l’aide des données renvoyées par les requêtes d’ID de bibliothèque (voir Énumérer les bibliothèques et Énumérer les éléments de bibliothèque). Nous allons obtenir les données de formulaire requises en accédant à Print Portal, dossier Modèles, sous-dossier Télécommunications, et sous-dossier TLC 39 pour imprimer TLC39 Laser_53_rf. La sélection de l’option Imprimer affiche les exigences de formulaire et les données par défaut du formulaire, comme suit :
Numéro de série : GRINGS00102028974810
ECI : 663726
CLEI : C5JAB3H1AA
Pays : US
Les fichiers qui contiennent des données de formulaire nécessitent deux passages d’API. Vous devez soumettre la première requête pour obtenir un message d’erreur qui indique un « printRequestID » nécessaire. Le TLC39 Laser_53_rf initial et sa requête de données de formulaire nécessaires ressemblent à ce qui suit :
{
"libraryID" : "de6940a6-ff73-465b-aaf2-d39504420fa6",
"relativePath" : "TLC39 Laser_53_rf.btw",
"printer" : "PDF",
"copies" : 1,
"DataEntryControls" : {
"Text Input Box 1" : "GRINGS00102028974810",
"Text Input Box 2" : "663726",
"Text Input Box 3" : "C5JAB3H1AA",
"Text Input Box 4" : "US"
}
}
Dans le code ci-dessus, remplacez « de6940a6-ff73-465b-aaf2-d39504420fa6 » par votre ID Librarian.
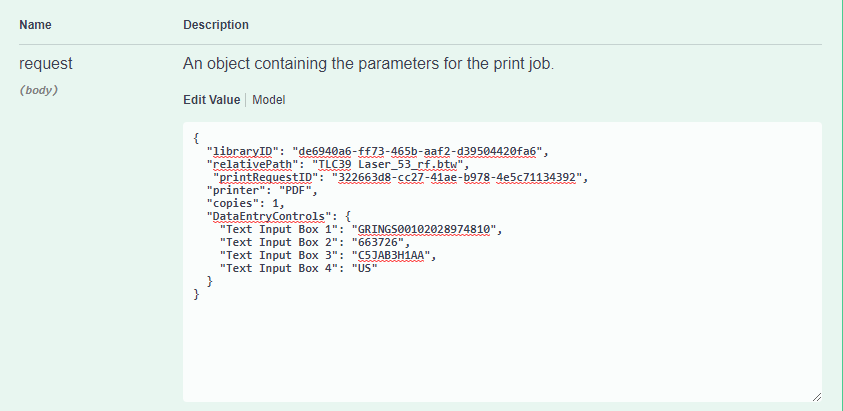
La réponse correspond à une erreur contenant un « printRequestID » nécessaire. Copiez le « printRequestID » et ajoutez-le à vos données JSON. L’objet JSON final incluant « printRequestID » a l’aspect suivant :
{
"libraryID" : "de6940a6-ff73-465b-aaf2-d39504420fa6",
"relativePath" : "TLC39 Laser_53_rf.btw",
"printRequestID": "c1cec9ba-1c42-4a74-93e1-96ecf235c403",
"printer" : "PDF",
"copies" : 1,
"DataEntryControls" : {
"Text Input Box 1" : "GRINGS00102028974810",
"Text Input Box 2" : "663726",
"Text Input Box 3" : "C5JAB3H1AA",
"Text Input Box 4" : "US"
}
}
Remplacez « de6940a6-ff73-465b-aaf2-d39504420fa6 » par votre ID Librarian.
Remplacez « printRequestID » par votre « printRequestID ».
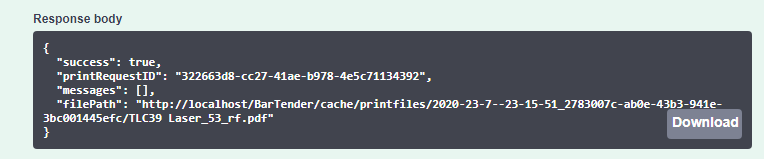
La soumission du code ci-dessus entraîne une réponse contenant le chemin d’accès au PDF.
![]() Exemple JavaScript : Imprimer un document simple avec un minimum de données
Exemple JavaScript : Imprimer un document simple avec un minimum de données
/* ----------------------------------------------------------------------
This example demonstrates how to print a file with no data entry form using as little data as
possible such as the absolute path where the file is located,
the printer used (in this case is a PDF printer) and the number of copies
*/

// Change this to the URL, library ID, and document path that you want to print
let basePrintPortalURL = "https://example.com/Bartender/";

fetch(basePrintPortalURL + 'print', {
  method: 'post',
  headers: {
    'Content-Type': 'application/json',
    // If authentication is enabled the header requires "'Authorization': 'Bearer ' + token" to be used
  },
  body: JSON.stringify({
            "AbsolutePath": "c:\\inetpub\\wwwroot\\BarTender\\Templates\\Document1.btw",
            "Printer": "PDF",
            "Copies": 2
             })
})
.then(response => response.json())
.then(result => {
  console.log(result);

   // If successful, the pdf file path is displayed
  console.log(result.filePath);

  // The printRequestID is used to continue the print job in case of a fail request
  console.log(result.printRequestID);

  // If not successful, an error message will be displayed stating the reason why.
  console.log(result.error);

  // Displays the status code of the error message
  console.log(result.statusCode);

})
.catch(error => {

    //The error message 'Failed to fetch' will be displayed in case there is an issue with the request
      console.error('There has been a problem with your fetch operation: ', error.message);
}); ![]() Exemple JavaScript : Imprimer un document avec un seul formulaire de saisie de données
Exemple JavaScript : Imprimer un document avec un seul formulaire de saisie de données
/*-------------------------------------------------------------------------------------------
Printing a file with a single data entry form and PDF printer */

// Change these to the URL, library ID, and document path that you want to print
let basePrintPortalURL = "https://example.com/Bartender/";
//let token = "token_value_from_authentication_call";

// Process our print job
fetch(basePrintPortalURL + 'print', {
  method: 'post',
  headers: {
    'Content-Type': 'application/json',
    // Make sure we add our authentication header to the print request using the token from previous example
    //'Authorization': 'Bearer ' + token
  },
  body: JSON.stringify({
            "AbsolutePath": "c:\\inetpub\\wwwroot\\BarTender\\wwwroot\\Templates\\Telecommunications/TLC 39/TLC39 Laser_53_rf.btw",
            "Printer": "PDF",
            "Copies": 2,
            "SerialNumbers": 4,
            "DataEntryControls": {
                "Text Input Box 4": "US",
                "Text Input Box 3": "C5JAB3H1AA",
                "Text Input Box 2": "663726",
                "Text Input Box 1": "GRINGS00102028974810"  }
               })
.then(response => response.json())
.then(result => {
  console.log(result);

  // The printRequestID is used to continue the print job in case of a fail request
  console.log(result.printRequestID);

  // Specify the data entry fields required to print the label
  console.log(result.requiredDataEntryControls);

  // If successful, a path of the result pdf lcation should display
  console.log(result.filePath);

  // For physical printers, displays a message "BarTender successfully sent the print job to the spooler."
  console.log(result.messages);

  // If not successful, an error message will be displayed stating the reason why.
  console.log(result.error);

  // Displays the status code of the error message
  console.log(result.statusCode);

})
.catch(error => {
  console.error('There has been a problem with your fetch operation: ', error.message);
});/*----------------------------------------------------------------------
multiple data entry forms and authentication
*/
let basePrintPortalURL = "https://example.com/Bartender/";
let token = "token_value_from_authentication_call";
fetch(basePrintPortalURL + 'print', {
method: 'post',
headers: {
'Content-Type': 'application/json',
'Authorization': 'Bearer ' + token
},
body: JSON.stringify({
"LibraryID": "9890beae-db51-4b74-a132-d6430a06a192",
"Relativepath": "Document1.btw",
"printer": "PDF",
"copies": 1,
"DataEntryControls": {
"Text Input Box 2": "Seattle, WA",
"Text Input Box 1": "Jon Smith",
"Date Picker 1": "2020-07-17 00:00:00Z",
"Text Input Box 3": "Developer",
"Text Input Box 5": "35 years",
"Text Input Box 4": "Microsoft"
}
})
})
.then(response => response.json())
.then(result => {
console.log(result);
// The printRequestID is used to continue the print job in case of a fail request
console.log(result.printRequestID);
// Specify the data entry fields required to print the label
console.log(result.requiredDataEntryControls);
// If successful, a path of the result pdf lcation should display
console.log(result.filePath);
// For physical printers, displays a message "BarTender successfully sent the print job to the spooler."
console.log(result.messages);
//If not successful, an error message will be displayed stating the reason why.
console.log(result.error);
//Displays the status code of the error message
console.log(result.statusCode);
})
.catch(error => {
console.error('There has been a problem with your fetch operation: ', error.message);
});/*--------------------------------------------------------------------------------------------
Printing a file specifying the root folder ID and relative path
This document has no data entry form */
let basePrintPortalURL = "https://example.com/Bartender/";
let token = "token_value_from_authentication_call";
fetch(basePrintPortalURL + 'print', {
method: 'post',
headers: {
'Content-Type': 'application/json',
'Authorization': 'Bearer ' + token
},
body: JSON.stringify({
"LibraryID": "9890beae-db51-4b74-a132-d6430a06a192",
"Relativepath": "Document1.btw",
"Printer": "Zebra GX430d - ZPL",
"Copies": 2,
})
})
.then(response => response.json())
.then(result => {
console.log(result);
// The printRequestID is used to continue the print job in case of a fail request
console.log(result.printRequestID);
// Specify the data entry fields required to print the label
console.log(result.requiredDataEntryControls);
// For physical printers, displays a message "BarTender successfully sent the print job to the spooler."
console.log(result.messages);
// If not successful, an error message will be displayed, ""
console.log(result.error);
// Displays the status code of the error message
console.log(result.statusCode);
})
.catch(error => {
console.error('There has been a problem with your fetch operation: ', error.message);
});