Insert a barcode object onto the template.
Double-click on the barcode to access the Barcode Properties dialog.
Select Symbology and Size from the list of property pages.
For Color, select white from the color palette.
Select Font from the list of property pages.
For Foreground Color, select white from the color palette.
Click Close to return to the template. You will see only the handles surrounding the barcode object.
Select the  icon on the main toolbar, and choose a rectangle from the list of shapes.
Draw a box around the barcode object.
Double-click on the box to access the Box Properties dialog.
Select Box from the list of property pages.
Under Fill Properties, set the color to black.
Click Close to return to the template. You will see a black box.
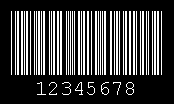
Select Send to Back from the Arrange menu. Your barcode will display in reverse type as shown in the example above. You may adjust the size of your box or barcode as desired.